Te create a necklace, glue your pom poms onto a larger piece of felt and trim around the edges of your flower, so the back piece cannot be seen from the front. Then attach a chain, and voila, you have your own cute pom pom necklace!
Wednesday, August 10, 2011
Felt Pom Pom {Tutorial}
One of my fabulous readers requested a tutorial for the pom pom necklace. I made a tutorial for the pom poms...the rest is really easy to figure out. Plus, I don't have another chain to connect this one to yet.
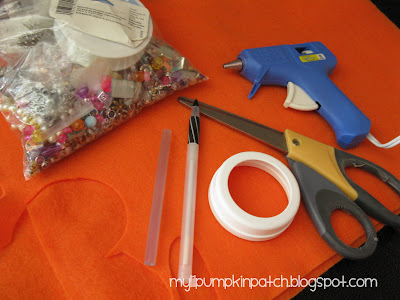
Here are the supplies you will need: glue gun, scissors, pen, felt, beads (optional), and template. (*Note: I used the lid of a baby bottle. The size of your circle determines the size of the finished pom pom.)
Draw lots of circles onto your felt. It takes 10 circles for each pom pom. I made 4 pom poms, so I needed 40 circles.
I drew on 20 circles and doubled up my felt, which cut the cutting time in half.
To make things easier, I pinned the layers together within each circle. This helps to keep the fabric from sliding while you are cutting. Thus, preventing odd-shaped circles.
Cut out all the circles INSIDE THE PEN LINE (so you don't have black edges!).
I stacked my circles into piles. I made 4 piles of 10. This isn't necessary, just fun, plus, you have all you'll need in one stack. Look at the cute little piles!
Take one circle and fold it in half.
Then fold the half in half.
Then put a dab of hot glue in the center and hold it for a few seconds. Do this to 9 circles for each pom pom.
Glue 4 of the folded pieces onto the bottom circle. Make sure all the folds are all facing the same direction when you glue them down.
Glue another 4 on top. Stagger this row, so this layer is overlapping the bottom row cracks.
Glue the last folded piece onto the top, and it looks like this! You can add a bead to the center also, which adds some pizazz!
Te create a necklace, glue your pom poms onto a larger piece of felt and trim around the edges of your flower, so the back piece cannot be seen from the front. Then attach a chain, and voila, you have your own cute pom pom necklace!
Te create a necklace, glue your pom poms onto a larger piece of felt and trim around the edges of your flower, so the back piece cannot be seen from the front. Then attach a chain, and voila, you have your own cute pom pom necklace!
Subscribe to:
Post Comments (Atom)


21 comments:
love making these! being radtastic ;) great tutorial!
Cute! Oh, just let me know when you have your guest post ready! Any time works... and it'd be fine to have just a little tutorial like you just did here :)
So beautiful . Such a visual treat
Cheers from Bangalore ,India
Dr Sonia S V
http://cardsandschoolprojects.blogspot.com
So bright and pretty. I am gonna need to make some of these. Thanks for sharing.
I seriously want to get an Accuquilt Go so that I don't have to hand cut circles anymore! Oh well, I guess I will have to wait, and not be lazy:)
Thanks for joining the Blog Hop again.
Amanda Joy
Terrific tutorial! I have some felt in my craft room just waiting to be used. Thanks for sharing.
Great tute! I would love it if you linked this up to my Tuesday Confessional link party going on now: http://www.craftyconfessions.com/2011/08/tuesday-confessional-link-party-and.html.
See you soon!
~Macy
Never knew it was just adding one to the center to finish it off. Drrr. Thanks for linking up with DIY under $5!
Nice! they look wonderful. I might try to make some. Thanks for sharing! :)
Super easy and cute!!!
http://lilioshka.blogspot.com/
So cute and so simple I want to try it! Thanks for sharing!
Hi, friend! You've got so much creativity and I'm admiring them all. Can you please share your creative posts at the Creative Bloggers' Party & Hop? Hope to see you there at the party :)
Wouldn't that be so cute in red at Christmas as a bow on a package?! And yes, I'm thinking of Christmas already! Lol! Thank you so much for linking up!
great tute...I'm going to give this a try :) over from debbiedoo's. now following
I love making these too! So cute :-)
cute!! thanks for the tutorial
Love these!!! My favorite place for them is on a wreath. Great tute. came by way of Tip Junkie
Wow, this is a really great tutorial! I love making flowers of all kinds, so this is right up my ally! Wonderful job!
By the way, I am hosting my very FIRST link party and I would love to have you link this to it--
http://southernlovely.blogspot.com/2011/08/show-share-1.html
Love it!! I have a box of felt that I can't wait to make into some pom poms!! Great tutorial!
I have been reading out many of your articles and i can state clever stuff. I will surely bookmark your blog.
Stradivarius 183 Bb Flugelhorn Silver
hello!,I like your writing so much! share we be in contact more about your article on AOL? I need a specialist on this area to resolve my problem. Maybe that is you! Looking ahead to look you.
Bogs Women's Classic Mid Tuscany Rain Boot
Post a Comment