Showing posts with label DIY. Show all posts

Thursday, December 12, 2013

Minion Costume


This past year, Isaac has loved watching Despicable Me and we decided it would be perfect that he be a minion for Halloween.  (By the time Halloween rolled around, we wished I had made the purple minion.  He is wanting to be more and more independent and do what he wants.  Ha ha!) 

My original idea was to buy a pair of overalls and a yellow shirt and call it good. My husband came up with the idea of making it big and poofy.  I loved the idea and made it up as I went.  It took a while to make, but I am so happy with the end result, and Isaac loves it too!  His little sister also likes it!


This is his minion face.  It cracks me up.   Boys are so funny!  


The costume is made of felt, and old pair of jeans, and some buttons.  So, it is pretty simple and very affordable.  I spent around $15 for everything.  Here are a couple more shots of my cute little silly minion!  


I first thought that it would be easier to get Isaac into the back, so I made an opening with buttons, but it turned out to be easiest to slip it on.  (The original plan was to sew leg holes, but it was easier to keep the bottom open.)  If I made it again, I would not make an opening in the back, and have it as a slip-on.

Wednesday, April 4, 2012

Kitchen Mini Makeover ~Topiary


Here is one of the projects I made as part of my kitchen window makeover.  I really wanted a topiary to sit on one of the shelves.  I was hoping to find a styrofoam ball at the dollar store, but all they had were square ones or the wrong size.

I was determined to keep this project really cheap, so I bought a bag of balloons, blew one up to size and wrapped it is yarn-covered glue.  I let it sit for a day until it was dry and solid, and then I popped the balloon.  You can see it pictured below.


 For this fund little topiary, I used my yarn ball, an unsharpened pencil, a flower pot that I painted gray, and lots of red felt. I spent a dollar on the pack of balloons, so this project was basically free, because I had the other supplies (my mom gave me the pot).


I was skeptical about using the yarn ball.  I was really worried that it would collapse.  But, I used lots of glue, and about a month later, it is still sitting strong. :)  To cover the ball, I cut up a bunch of red felt strips and hot glued them on.  I stuck the end of a pencil inside one of the holes in the ball and hot glued.  Then, I secured it by gluing felt to the pencil and anchoring it down.  Surprisingly, it was a pretty tight hold.


I was going to cut a bunch of circles and make little pom-poms to cover the whole thing, but I changed my mind really fast, knowing that it would take way too long!  I decided to use squares instead.  I just eye-balled them, so they are about 1" squares.


I ended up using all of the red felt that I had leftover, and had barely enough.  I just love when this happens.  Anyways,  fold the square in half two times and place a dab of hot glue in the center.


I started hot gluing the pieces to the ball side opposite the pencil.  I turned them random directions so it didn't look uniform.

I secured the pencil a little bit better with more felt as I got closer to getting the ball completely covered with felt squares.


I wrapped some burlap around the pencil several times to add some fun texture and color.  I wrapped it a couple of times to make the base look thicker.


I filled the base with rocks that I bought at the dollar store...oops, I guess I spent $2 for this project.  Still awesome though, right?


Here it is all covered and almost finished.  There is just one more finished touch...


Wednesday, February 22, 2012

Doily Shirt {Gift}

Remember the doily shirt I made last summer?  I decided to make one for my sister for her birthday.  I love the doilies that I found.  It was super simple and quick.  It makes me want to make another one for myself using this print.


Note: As mentioned in my previous doily shirt post, I found the tutorial for this at Maybe Matilda.

Thursday, January 12, 2012

Pig Rug {Oink, Oink}

I decided to use some inspiration I found on Pinterest...
Cute rug, huh?!  You should head over to Happy Lizard Hill and read the story - it's pretty funny!  Well, my aunt collects pigs and her birthday was coming up, so I decided to give it a try.
I bought about 5 t-shirts and made yarn out of them (I googled how to do it), and then I found a doily pattern and started crocheting.  I didn't make the whole doily, but just kept going till it was the size I wanted.  I made a huge doily and then the ears and a snout, and of course it had to have googly eyes!
The whole thing was ripply after I got done and I was a little worried, but I ironed it and it worked perfect! I used a squirt bottle to dampen and then ironed and it got pretty flat and stayed that way.  I love the way it turned out...oink, oink!

Wednesday, October 26, 2011

Pallet Coat Rack {Tutorial}

Today I am going to show you how to make this coat rack out of a pallet!  I actually guest blogged over at A Little Tipsy a few weeks ago, but I wanted to share it on my blog in case you missed it!


I actually only had to buy a couple of things for the Pallet Coat Rack.  I spent a grand total of about $7.  If you would like to make one, this is what you will need:

Pallet
Sander & Sand Paper
Hammer
Flat Head Screw Driver
Glue (I used Tacky, my fav!)
Mod Podge
Coat Hooks
Scrapbook Paper
Hanging Hardware
Sealant Spray
Drill and Drill Bits (opt.)


Decide which board you will remove.  I tried hammering off the board, but only cracked it…oops.  I discovered that it was much easier to wedge the screwdriver between the boards and hammer the end of the screwdriver.  This way the wood separates without cracking.  Remove nails.


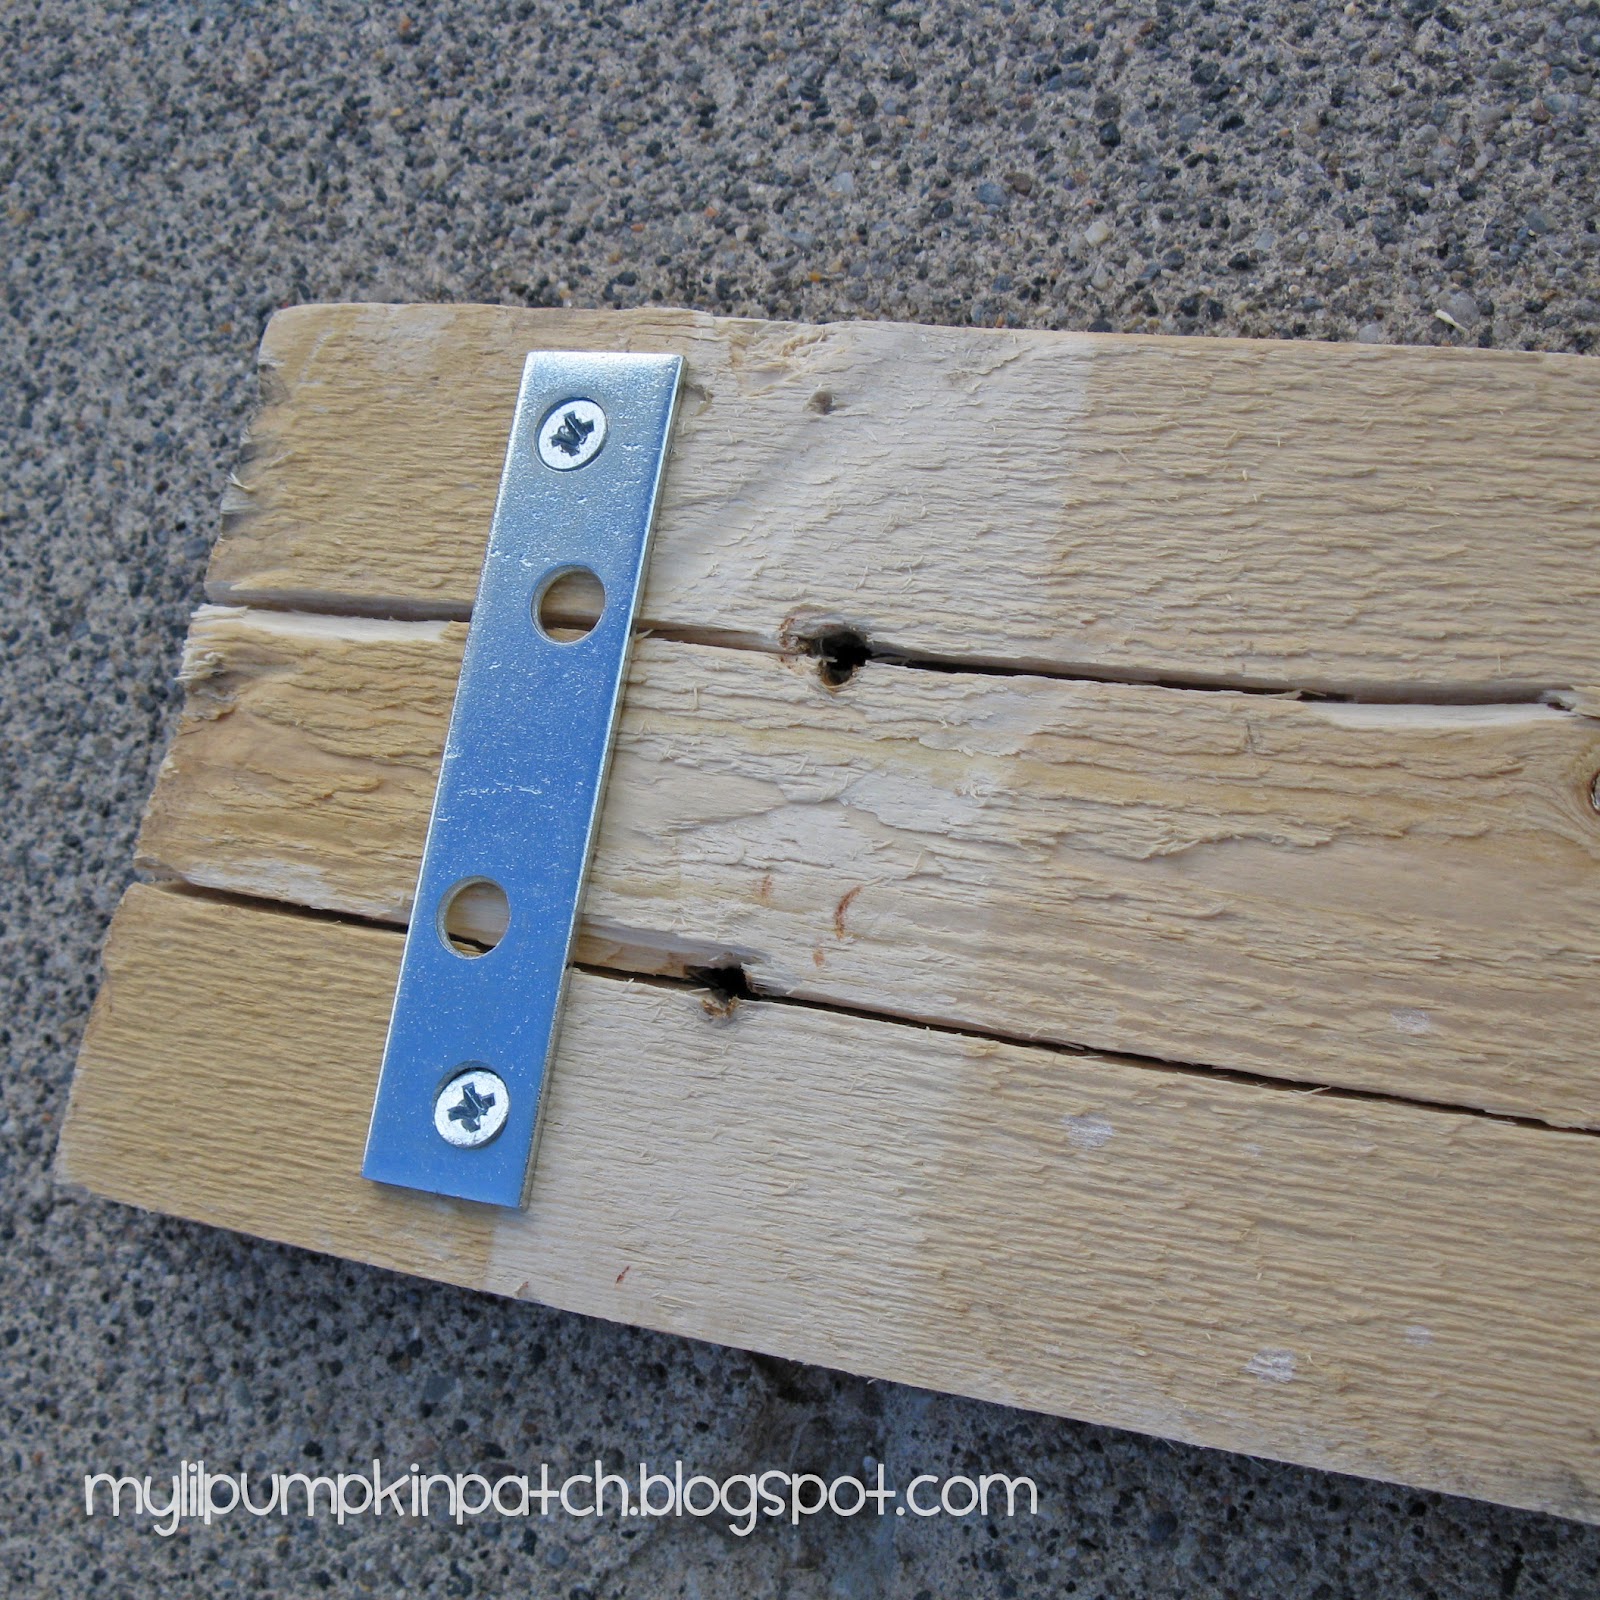
I was about to try for a new board after cracking the first one, but then I decided the cracks added some character.  To keep them from splitting more, I attached a few of these flat metal brackets.  I found them at the hardware store.  They come in handy with wood projects all the time!


Speaking of character, I just love the words printed onto the board!


I lightly sanded the board to smooth the rough edges and ends to prevent splintering.  I didn’t want to sand too much, because I wanted the words to remain on the board.


See how much difference the sander makes?


To decorate the board, I used a paper pad that had coordinating papers.  I cut the paper into squares and rectangles to create a pattern.  I really like the look of bare wood showing through.  (I also thought it would be fun to paint chevron stripes.)  


After I figured out my layout, I glued everything on with Tacky glue (it works great on wood and paper).  Then, I brushed a layer of mod podge on top.


I looked for coat hooks at the hardware store, but they were pretty pricey.  (The joys of small town hardware stores...).  I wasn't going to spend $3 per hook, so I decided I would keep looking.  I found these egg stands at the craft store in the wood section.  When you turn them upside down, they make perfect hooks for hanging things!  


I spray painted them white so they would stand out from the paper and the natural wood color. 


To attach them, I drilled holes that were slightly smaller than my screws through the pallet. Then, I twisted the screws through until they were flush with the front of the board.  Then, I put the hooks on top and carefully twisted the screw into the wood.  (To make this easier, do this step before you glue on the paper - that's what I did!)

Then, I unscrewed my attached knobs and filled the hole in the knob with tacky glue and also put a bunch of glue around the inner section to stop slipping. 


Finish with a few layers of sealant spray, and then attach hanging hardware.  Fun, huh?  I made this for my aunt and she loved it (which made me very glad!)

I am linking this up here and here.

Wednesday, October 5, 2011

DIY Hair Feather

I love hair feathers!  I decided to make my own since it saves money and I always like to try new things.  It is actually really easy.  It took be a few attempts to get it just right, but now I have a removable hair feather that I can wear anytime.


I bought some straight peacock feathers at a sports store in the fly-tying section.  There was a package for less than $2.

Lots of feathers, huh?!  Well, I basically just hot glued the feathers to the bobby pin.  I actually bent then around the bobby pin to make a clean edge and then wrapped a couple of strands around the top to secure things.


So easy!


I am linking up here and here.

Monday, October 3, 2011

Rue 21 Knock-Off Necklace

I went to Rue 21 a couple weeks ago and saw this super cute ruffle necklace.  I fell in love with it.  The price wasn't bad, but when I can make something for significantly less, I do.  Besides, it was fun to try something new!

 Here is the original.  I just love the ruffles.  I usually don't wear gold jewelry though, so I came up with this:

 I used brown ribbon, tulle, needle, thread, bead chain, scrapbook metal flower, pearls, felt (for backing) and hot glue.

To make it, I pleated the ribbon, ruffled up the tulle, and sewed/glued on the pearls and the flower.  Then to create the shape, I glued it to felt and trimmed around it.  Next, I glued on the chain. 
(The flower was originally gold so I spray painted it white and hot glued a pearl to the center.)

Linking up here and here.

Thursday, September 22, 2011

The Tohoku Tote {My Version}

I decided to participate in the "Create With Me" over at UCreate this month.  September's project is the tote bag from I Am Momma Hear Me Roar.

I payed less than a dollar for this bag!  I won some burlap from a giveaway over at Debbiedoos, the lining is a would-be thrifted t-shirt, and the paisley fabric is a $1 fat quarter from Walmart!


Unfortunately, I am not very good at reading and following directions (I just get too excited), so I had to modify things, so the bag turned out smaller...it is more of a purse size.  I love it though!  I got lots of compliments on it my first time using it!

Linking this up here and here.

Wednesday, September 14, 2011

It Roaaaarr's! {Two}

Remember my previous post of this little cutie?  This is the dinosaur costume I made for Isaac last year.  I made it with ultra cuddle fleece, so it is so soft, snuggly, and warm (perfect for Halloween).  He looked so adorable in it and I was surprised at how much he wanted to wear it (at least once a week).  Well, it turns out, he's not the only one that thinks a cozy dino costume is the cat's meow.

 Enter Dino Man.  Yep.  Isn't he handsome?  I think so.  The most handsome Dino Man I've ever seen.  My husband came up with this great idea that we should all be dinosaurs for Halloween this year.  He has been saying this since last Halloween.  I thought he was joking, but nope, he was serious. This was great for two reasons: 1.I got to go to the craft store. 2. I got to spend money there. :)  (Not that I don't get to do that anyway, but here's another excuse to go).

To make it, I used McCall's #8953 pattern. (Which consists of a lion, cat, bunny, etc.)  I knew I wasn't going to find a pattern of what I wanted exactly, so I looked for something that had a full body suit.  All I used from the pattern was the front piece, back piece, and sleeve pieces.  The other things I had to come up with on my own.  So, I designed the hood, spikes, belly, tail, and slippers.  It was quite the adventure, but it was well worth it.  I learned a lot, which will benefit me on future sewing endeavors.  My husband loves it and is currently wearing it.  It feels great that he loves it so much!  

 Let me show you the details. Besides being super comfortable and warm, this costume has many other great features:


 A cute blue belly, complete with zipper.  (I even got the zipper right the first time, which doesn't happen regularly).


 Check out these cute slippers.  They have blue lining inside and they are padded as well.  The bottom has the no-slip fabric on them (I am just realizing I forgot a picture of that...Sorry!).


 There are these two-toned spikes down the whole back.


 And check out this tail!  It wiggles when you walk, which makes it all the more fun!  Here's one last peek of the costume:


I am planning on making myself one of these dino costumes too.  The fabric is on its way and should be here soon, hopefully!  Any guesses as to the colors of mine?

I am linking up here and here.

You May Also Like:

Related Posts Plugin for WordPress, Blogger...

ShareThis