Showing posts with label Halloween Decor. Show all posts

Friday, October 21, 2011

Pumpkin Ombre Window

I have been loving all of the ombre decor.  I decided to dress up this window for Halloween.


 All I did was cut out pumpkins with my Silhouette and taped them on.  I think it would look awesome if they were attached with some foam tape, but I didn't have any.  I am trying to use what I have since I have such a large supply of crafts. (Thus the Stache Party)


I am linking up here and here.

Wednesday, October 19, 2011

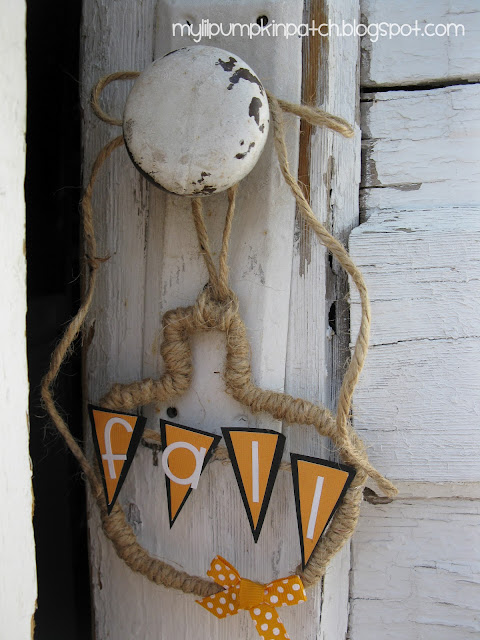
Fall Doorknob Decor

I am going to show you how to make this super easy and cute fall door decor today.


 These are the supplies you will need. I had everything I needed on hand, but if you need any of the supplies, they are very inexpensive.


 You will also need some cardstock and letter stickers.  As you can tell, these are scraps and leftovers. :)  Thank goodness I could spell out the word "fall," since they are almost gone!  If you don't have stickers, you could cut out letters or even draw them on.


 The first thing you'll need to do is cut a piece out of the hanger that is approximately 12" long.  You will be bending it into the shape of a pumpkin.


 I started bending at the stem.  I used pliers at first, but then discovered it was easier to do the bending with my hands.


 Next, I took some floral wire and began wrapping it around one of the raw edges of the stem section.


 I wrapped the wire around a whole bunch of times and connected the two raw edges to make one continuous line.  It doesn't have to be pretty, because this will be covered up in the end anyway.  Just make sure the two ends are held together well.


 Put a dab of hot glue on the wire and start wrapping your jute twine.  I found it easier to cut a big piece of twine, instead of trying to fit the whole spool through the opening.


 Just keep wrapping, wrapping, wrapping (I may have seen Nemo too many times...Isaac loves it).  I hot glued every 1/2" OR when the twine started to slide.  I also wrapped the twine loosely but pushed it close together so it was fatter to add some volume.


 Next I cut out some pennants (can be done with Cricut, Silhouette, or by hand) and stuck my "fall" letters to them.  I decided to make the black a little bit bigger to create a nice border.


 I tied a bow and then glued in on to the bottom right corner to balance things out and add some more color.


 I decided to use a piece of twine to hang this on the door knob.  Just take a long piece and loop it through the stem of the pumpkin.  It is better to make it too long than too short - you can always trim!


Tie the twine in a bow around the top of the doorknob.


Isn't it pretty?  I think it adds such a fun touch.  It is so simple and so easy!


I will be linking up here and here.

Wednesday, October 12, 2011

Our Rainy Day Halloween Decor

Last week the weather was rainy and cloudy and one of those days weeks where you would rather be curled up on the couch in your pajamas.  Something about rain I guess.  Then, later in the week, it actually snowed!  I had to go outside and rescue my pumpkins (I grew some in my garden this year and they actually grew!  I got two about the size of a kid's basketball...yay!)

I have been seeing all kinds of cute Halloween decor around blogland and realized that I don't have very much!  One of our rainy days was perfect for making some simple Halloween decor for Isaac's room.  He helped me too, which made it extra fun.


 I had a leftover block from a previous project, and I decided to make it into a pumpkin.  I cut orange paper out and glued it to each side.  Isaac loved helping me glue!  The little man LOVES pom poms, so that is what we used for the smile and eyes.  (Isaac has loved them forever!  In fact, my mom gave him a whole tin full of them!  I used to take them to church in a mini m&m container and he would dump them out and then put them all back in...it worked awesome!)


 My mom also gave us some foam letters and googly eyes.  Isaac loved gluing them on.  We had puddles of Elmer's school glue all over the table.  I am probably going to make a frame for this and hang it in his room, but for now it's on the fridge.


 More pom pom love.  I made some garland by stringing pom poms onto thread.  They stayed in place really well so I didn't have to glue them or anything.  Then I taped it around his window.  I love easy projects like this!

I was inspired to make this spider from a tutorial over at Homemade By Jill.  She has some really fun ideas, and a few of my projects are inspired by hers.

I will be linking this up to parties listed on my party page as well as here.

Wednesday, September 21, 2011

Guest Post: Christina Johnson

Today is a bit busy, because I am guesting over at DIY Kinda Girl (come see how to make this cute skirt) AND I have a guest poster on my blog today!  ALSO, come back FRIDAY to see the other cute little things I made to go along with this skirt!  So fun!


Today we get to hear from Christina Johnson.  She has written an article on tasteful Halloween Decor.  I found it to be very helpful and I figured all of my readers would too!   And, if you haven't already, go ahead and follow me on Facebook and/or Twitter to get the latest updates and join in some conversations! 
 Here's Christina:

Don't Scare the Trick or Treaters Away?
By: Christina Johnson

With fall just around the corner, so is sweet fun of Halloween. Just as everyone likes to dress up for the holiday, feel free to dress up your house too! Halloween decorations don't have to be all orange, black and covered in cotton spider webs—with a little thought and creativity, you can transform your home or Manhattan rental into a festive and tasteful Halloween-ready home.

Follow these simple tips to avoid your house looking frightful for all the wrong reasons:

Simplify: While it might be tempting to stroll down the Halloween aisles and pick up anything with an orange or black color, show some restraint. Focus on a few, key pieces within a theme for a classic, lasting look.

Don't Be Too Scary: Halloween is about monsters and costumes yes, but you don't have to have every square inch of your yard covered in Halloween paraphilia; fake cemetery, plastic spiders, ubiquitous cobwebs, and inflatables. Try not to be that house. Instead, go for a few items that will make a big impact. A big fall wreath on the door will last through to Thanksgiving. A hay bale and a couple of well-placed jack-o-lanterns will jazz up any entryway. Lanterns up the steps provide much-needed lighting for little trick-or-treaters, and look festive, as well.

Themes: Focus in on one major look, and do it well. Think about a timeless black and white theme; black and white Halloween dishes, black cauldrons filled with Spanish moss and white-painted pumpkins. Take a white plate and add black Halloween decals, then add it to a collection of black and white patterned dishes for a classy look. A fall cornucopia theme is another option. Place colorful gourds of varying sizes in a glass urn for a fabulous centerpiece. For a little Halloween bling, paint pumpkins, leaves, and sticks gold. A benefit of this look is that it will last all autumn long.

Keep it in the Group: Within the chosen theme, group items together. Place a group of ceramic jack-o-lanterns together on the fireplace. Fill a unique grouping of different sized glass containers with candy corn, caramel popcorn, and licorice. With the black and white theme, use black and white candies. Stack apple crates filled with pumpkins for a holiday display where some height is needed.


Tasteful Halloween decor makes a house inviting to guests, looks festive and avoids the cheap or kitschy look that sometimes goes with the holiday.

Thanks so much, Christina!  Doesn't she have such great tips!


Linking this up here and here.

You May Also Like:

Related Posts Plugin for WordPress, Blogger...

ShareThis